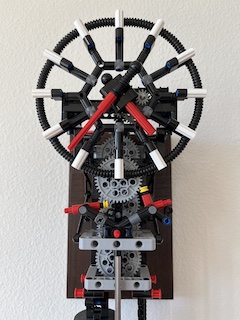
This LEGO pendulum clock is truly practical to use as a clock: it runs for over 72 hours or 3 days, it is very easy to rewind in just a few seconds, and it can be accurate to within a minute per day. A screw on the pendulum bob allows precise adjustment of the effective length of the pendulum. The hands can be easily moved to set the time. These features all make it possible to have a real working clock made of LEGO!
 |
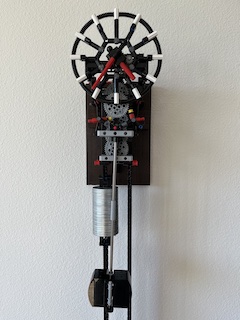 |
| LEGO pendulum clock |
This video shows how the clock works, and shows what some of the parts looked like after running continuously for about one year. This video shows the improved escapement that should eliminate the issues shown in the previous video.
This clock operates similarly to most mechanical pendulum clocks:
- A drive weight slowly falls, providing energy to the mechanism through a series of gears to an escapement.
- The escapement provides a small amount of energy to a pendulum to keep it swinging, and the pendulum regulates how quickly the escapement wheel can turn.
- Gears connected to the escapement drive the hands of the clock such that if the pendulum maintains a particular period of oscillation, the hands will keep time correctly.
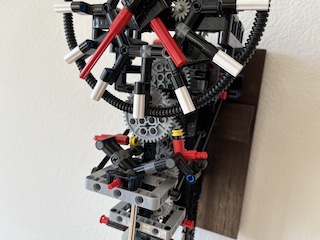
The escapement is a grasshopper escapement built around a 40 tooth gear as the escapement wheel.
 |
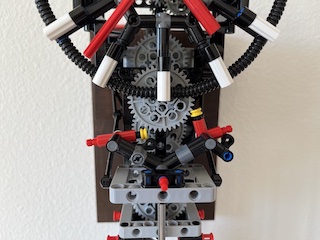 |
| Closeups of the escapement |
The knob on the pendulum bob allows the effective length of the pendulum to be precisely adjusted, enabling very accurate time-keeping.
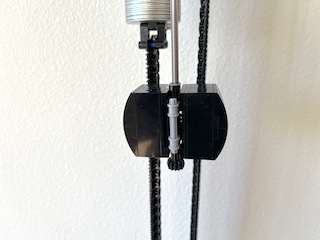
The clock is driven by a 560 gram weight hanging on a chain, which falls 1.6 cm/hour, for a power consumption of about 25 microwatts. To rewind, simply lift the drive weight. The chain drives a freewheel, which allows the chain to be pulled freely through the clock in reverse. The freewheel rewinding mechanism has minimal friction while the drive is engaged.
 |
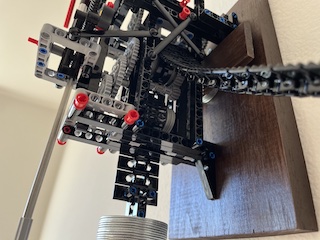 |
| Pendulum bob and drive freewheel |
The chain is a loop connected back to the bottom of the weight, to maintain a consistent drive force by balancing the chain.
Here is an Stud.io file and building instructions for this clock. There are some differences not shown in the Stud.io file or instructions:
- The pendulum in the video is made with steel axles from the Brick Machine Shop, in an attempt to make the pendulum less sensitive to temperature. However, these appear to be no longer available, and so the pendulum will require a different length. You’ll have to experiment with the length of the axles.
- The drive weight uses large washers, which are not part of the Stud.io file. You’ll have to find similar washers or get creative to design your own weight! I took a technic beam to the hardware store and bought the biggest washers with the tightest fit I could find.
- The length of the chain can vary, but to run for 3 days, you’ll need about 200 of the tread links. Of course, if you want to use more chain, the clock could probably run for 4 days or even longer if mounted high enough.
- I couldn’t figure out how to connect the hoses in the clock face, so these parts are detached from the model. They might need to be cut to length.
If you do attempt to build the clock, here are some additional tips and comments:
- The escapement will need some effort to tune. The position of the yellow pallets controls where the pendulum swings, and the position of the rubber liftarms controls how the pallets engage the escapement.
- The rubber liftarms used in the escapement make the clock nearly silent. If you want a louder ticking sound, use a regular liftarm instead.
- Make sure all of the axles spin very freely, any extra friction will make the clock run poorly.
- The “feet” of this clock are designed to hang on a mount similar to a “French cleat”. It helps to mount the clock on a beam that can be rotated to adjust the beat.
- Just like a real clock, it is best to set the time by moving the hands clockwise. I’ve never noticed disruption to the escapement tuning to move the hands counter-clockwise, but it might be possible.
- I removed some of the friction bumps from the friction peg/axle part in step 20, to reduce the friction when moving the hands to set the time. I left 2 of the 8 bumps, on opposite sides of the peg.
If you want to see more LEGO clocks, check out David Ziemkiewicz, Ben Van de Waal and KEvronista on YouTube.